Draw a continuous purple line then click the green check. Optionally in the Properties palette under Mechanical select a system type.
Modelling Revit Pipes At A Vertical 45 Degree Angle Imaginit Building Solutions Blog
I find this much faster and keeps spacing consistent especially if you have pipes at different heights etc.

. From r12 to r18. Just draw all the pipes in one short section with the correct spacing. Modeling Using SysQue Systems Pipe To Draw a line of Pipe using the selected system click on the button for Straight Pipe in the SysQue Systems Pipe system window.
Then you should just have to call out the 3 pipes in plan view and the contractor should refer to. 1- CHOOSE BETWEEN SKETCH A PATH OR PLACE ON HOST. However from the Floor Plan view you can pick a start point and elevation for a pipe run via the OFFSET option example 9 then change the OFFSET value to something much higher 30 and select the.
Now select the excess pipe and the tee like below. You will have to do this for duct tags and pipe tags. Sketch on Path or Place on Host.
And yes that slope is 227739 1932 12 technically mathematically impossible but there it is. Select the horizontal and vertical pipe to connect them. In the drawing area click to establish a start point for the pipe.
2 I then enter the vertical offset height of this pipe say 8-0 at current level. A vertical segment is automatically created extending from the original offset to the newly applied offset. Then copy the whole group of parallel pipes rotate change height if needed trim everything.
Press HR to restore the hidden element. Easily change the position length diameter fall. The symbol options listed are.
Its a dynamo script that gets the end coordinates of all pipes and checks if they have the same X and Y coordinates Therefore the pipe is vertical. On the Options Bar specify a different Offset click Apply and click Modify. There is no built in way to filter vertical stuff but you can try this.
Posted by Cherisse Biddulph on 10032014 at 1124 AM in Autodesk Revit Building Solutions Permalink. Select the pump elbows and vertical pipe by window selection. On the Place Pipe tab Placement Tools panel.
Click the base point near the pump move your pointer until the dashed rectangle near the wall. In the Type Selector select the pipe type. Double-click the view name from Project Browser.
Posted October 3 2018. But this post will show how it works. Go to 1 plumbing view to examine the pipe.
Across the top of the modeling area appears a new properties bar. Show 3D modeled pipes 2D lines or both - at any time. In the Type Selector select the pipe type.
A vertical segment is automatically created extending from the original offset to the newly applied offset. Optionally in the Properties palette under Mechanical select a system type. The 3D pipes and 2D line representation are built into the one family.
Load the family into your project. 1 Start piping command while in plan and pick a offset point say 0-0 at current floor level. Of particular interest are two items the Diameter textboxes B and the Offset combo box C.
Controlling Revit Pipe Rise and Drop Symbols This is an easy one. You can draw horizontal pipe segments in a plan view. On Revit ribbon go to Modify tab Modify panel and click trimextend to corner.
As far as the stacked piping goes technically since you have a section cut that should indicate to the contractor that there are pipes stacked vertically. On the Place Pipe tab Placement Tools panel select placement options. On the Place Pipe.
When creating a railing you can pick between of two creation options. You will see the pipe length is automatically shortened after you move the pump. Share on other sites.
Attached is a screen shot of a typical situation where as a result of pipe constantly moving within Revit a vertical pipe has developed a slope. From properties un-check the Rotate with component. We need to trim the pipe.
Working in the top view osnap end will snap to the upper end of the vertical line. Do not select on anything in the drawing area. As seen in the Type Properties dialog below.
The Pipe System has several RiseDrop symbol parameters single line Detail Level Course or Medium andtwo line Detail Level Fine. Try setting elevation to at least one half the value of the upper end. On the Place Pipe tab Placement Tools panel select placement options.
In the drawing area click to establish a start point for the pipe. Essential Pipe Revit Families. I pick the point where to start pipe.
Open the view for the system. This option allows you to draw a railing outline any way you wish to. Laterals Risers Traps P S All the pipe families have just the right complexity for architectural piping and plumbing layouts.
Press MV to activate move command. Ill draw everything plumb change one pipe location and then vertical. Then copy the whole group of parallel pipes rotate change height if needed trim everything.
As Julian said section views are the best to draw vertically but you do need a specific something there to start with end of a pipe connector on fixture etc. In the drawing area click to establish a start point for the pipe. Click Systems tab Plumbing Piping panel Pipe or Pipe Placeholder.
Click to complete the move command. On the Options Bar specify a different Offset click Apply and click Modify. In the drawing area click to establish a start point for the pipe.
A vertical segment is automatically created extending from the original offset to the newly applied offset. Now check again in System Browser. Open the tag family.
I do the exact same thing. Then it sets a yesno Is Vertical parameter which you can use for view filters or schedules. Click Systems tab Plumbing Piping panel Pipe or Pipe Placeholder.
Select the pump elbows and vertical pipe by window selection.
Solved Pipe Line Horizontal And Vertical Autodesk Community Revit Products

Tutorial 8 How To Make Vertical Stacks In Your Revit Project With Wavin Packages For Bim Youtube

About Drawing Pipe In An Elevation View Revit 2019 Autodesk Knowledge Network

About Drawing Pipe In A Section View Revit Autodesk Knowledge Network

Vertical Pipe 45 Degrees Youtube
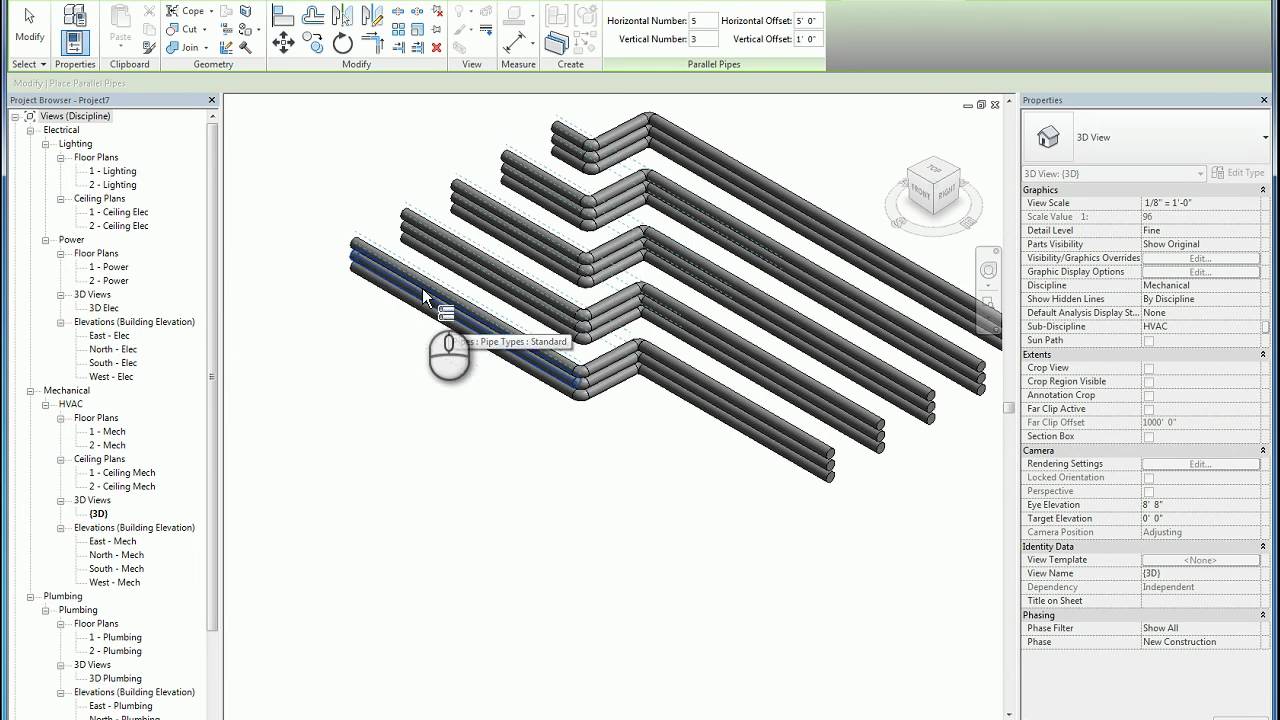
Revit Parallel Pipes Conduits Youtube

About Drawing Pipe In A Section View Revit Autodesk Knowledge Network

Revit Mep Vertical Offset Youtube
0 comments
Post a Comment